1. 设计理念
天气常常影响着人们的出行,为了给人们提供方便的天气信息以及未来的天气情况,我们开发了这款雷狮APP,用户可以通过我们的APP定位所在的城市,并查看本周的天气情况,此外,我们还制作了一个小游戏,帮助客户在无聊的时候休闲放松。
2. 设计模块
- 天气预报模块:实现基本的天气预报、通知和分享功能等。
- 小游戏模块:实现曾经风靡一时的2048小游戏。
3. 问题描述
3.1 天气预报模块
3.2 2048游戏模块
4. 设计简要描述
4.1 天气预报模块设计
- 因为网络服务延时较长,影响用户体验且Android Studio已不允许在主线程中访问网络,所以获取网络数据,必须开辟一个新的线程。由于需求的JSON数据量不大,采用最原始的JSON数据解析方法,通过JSONObject对象来解析
- 对于SQLite使用,根据实验前分析要建立一张天气表,来存放天气的状况,建立一张城市表,来存放当前的城市名。基本逻辑如下:首先获取城市表中最新的城市名,新建线程并利用这个城市名获取JSON数据,解析JSON数据并存入数据库天气表中。UI显示数据时,直接访问数据库,获取数据并显示。
- 添加菜单时,需要在activity中添加,不能在fragment中添加。
- 对于地图的定位,我们使用高德地图的API来定位,导入jar包,建立地图管理类,使用地图容器,重写各个生命周期。定位成功后,将定位到的城市名存入数据库,否则提示定位失败。
- 在使用后台服务时,首先访问网络,获取新的天气数据存入数据库。再打开数据库,通知用户。最后通过延时服务来调用这个后台服务,保证销毁这个APP后,依然可以实现后台通知。
- fragment与activity通信,可以通过回调函数实现,fragment与fragment之间的通信可以通过广播通信实现。
- 在设计UI界面时,通过访问数据库获取并显示数据,最后建立线程实现加载网络图片。
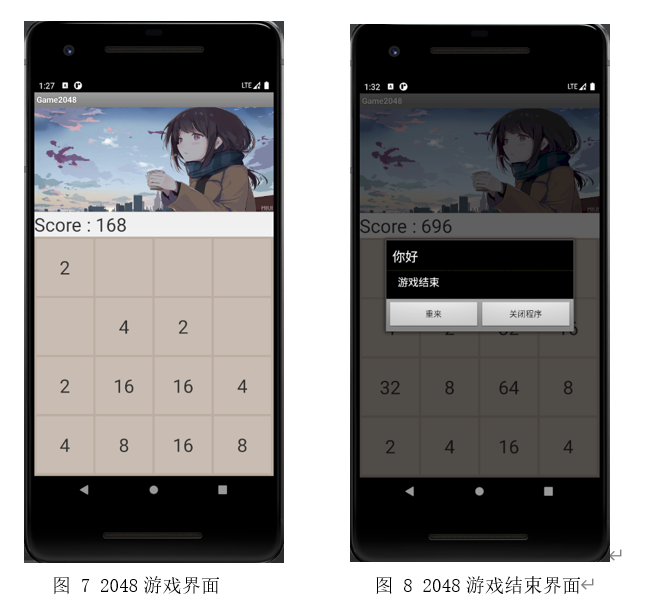
4.2 2048模块设计
- 设计2048游戏布局
- 实现2048游戏主类GameView
- 游戏2048在Android平台的触控交互设计
- 实现2048游戏的卡片类
- 在2048游戏中添加随机数
- 实现2048游戏逻辑
- 游戏2048的计分实现
- 游戏2048结束检查
5. 项目关键步骤设计
5.1 天气预报模块
5.1.1 获取天气预报数据
1
2
3
4
5
6
7
8
9
10
11
12
13
14
15
16
17
18
19
20
21
22
23
24
25
26
27
28
29
30
31
32
33
34
35
36
37
|
String url = Uri.parse("https://api.openweathermap.org/data/2.5/forecast?")
.buildUpon()
.appendQueryParameter("q", cityName)
.appendQueryParameter("appid", API_KEY)
.appendQueryParameter("mode", "json")
.build().toString();
String jsonString = getUrlString(url);
public byte[] getUrlBytes(String urlSpec) throws IOException {
URL url = new URL(urlSpec);
HttpURLConnection connection = (HttpURLConnection)url.openConnection();
try {
ByteArrayOutputStream out = new ByteArrayOutputStream();
InputStream in = connection.getInputStream();
if(connection.getResponseCode() != HttpURLConnection.HTTP_OK){
throw new IOException(connection.getResponseMessage()+":with "+urlSpec);
}
int bytesRead = 0;
byte[] buffer = new byte[1024];
while ((bytesRead = in.read(buffer)) > 0) {
out.write(buffer, 0, bytesRead);
}
out.close();
return out.toByteArray();
} finally {
connection.disconnect();
}
}
public String getUrlString(String urlSpec) throws IOException {
return new String(getUrlBytes(urlSpec));
}
|
5.1.2 启动一个新的线程,通过JSONobject对象来解析。
1
2
3
4
5
6
7
8
9
10
11
12
13
14
15
16
17
18
19
20
21
22
23
24
25
26
27
28
29
30
31
32
33
34
35
36
37
38
39
40
41
42
43
44
45
46
47
48
49
50
51
52
53
54
55
56
| new Thread(new Runnable() {
@Override
public void run() {
try {
jsonObject = new JSONObject(jsonString);
String cityName;
double temp_max;
double temp_min;
double pressure;
double humidity;
String weatMain;
String weatIcon;
String date;
String oldDate = null;
JSONObject city = jsonObject.getJSONObject("city");
cityName = city.getString("name");
Log.i(TAG, "cityName:" + cityName);
JSONArray list = jsonObject.getJSONArray("list");
for (int i = 0; i < list.length(); i++) {
JSONObject listMain = list.getJSONObject(i);
JSONObject main = listMain.getJSONObject("main");
temp_max = main.getDouble("temp_max");
temp_min = main.getDouble("temp_min");
pressure = main.getDouble("pressure");
humidity = main.getDouble("humidity");
JSONArray weather = listMain.getJSONArray("weather");
JSONObject weatherMain = weather.getJSONObject(0);
weatMain = weatherMain.getString("main");
weatIcon = weatherMain.getString("icon");
JSONObject wind = listMain.getJSONObject("wind");
Double speed = wind.getDouble("speed");
date = listMain.getString("dt_txt").substring(0, 10);
if (!date.equals(oldDate)) {
Log.i(TAG, "date:" + date);
values.put("date", date);
values.put("weather", weatMain);
values.put("picture", weatIcon);
values.put("maxC", temp_max);
values.put("minC", temp_min);
values.put("humidity", humidity);
values.put("pressure", pressure);
values.put("wind", speed);
db.insert("weather", null, values);
oldDate = date;
values.clear();
}
}
} catch (JSONException e) {
e.printStackTrace();
} catch (IOException e) {
e.printStackTrace();
}
}
}).start();
|
5.1.3 SQLite的使用
1
2
3
4
5
6
7
8
9
10
11
12
13
14
15
16
17
18
19
|
public static final String CREATE_CITY= "create table city (cityName text)";
public static final String CREATE_WEATHER = "create table weather("
+"date text,"
+"weather text,"
+"picture text,"
+"maxC real,"
+"minC real,"
+"humidity real,"
+"pressure real,"
+"wind real)";
private Context mContext;
public synchronized static DatabaseHelper getInstance(Context context, String name, SQLiteDatabase.CursorFactory factory, int version) {
if (mInstance == null) {
mInstance = new DatabaseHelper(context, name, factory, version);
}
return mInstance;
};
|
5.1.4 通过创建线程加载网络图片
1
2
3
4
5
6
7
8
9
10
11
12
13
14
15
16
17
18
19
20
21
22
23
24
|
public Bitmap getPicture(String picture){
Bitmap bm = null;
URLConnection conn= null;
URL url;
try {
url = new URL("https://openweathermap.org/img/wn/"+picture+"@2x.png");
conn = url.openConnection();
conn.connect();
InputStream is=conn.getInputStream();
bm= BitmapFactory.decodeStream(is);
} catch (MalformedURLException e1) {
e1.printStackTrace();
}catch (IOException e) {
e.printStackTrace();
}
return bm;
}
|
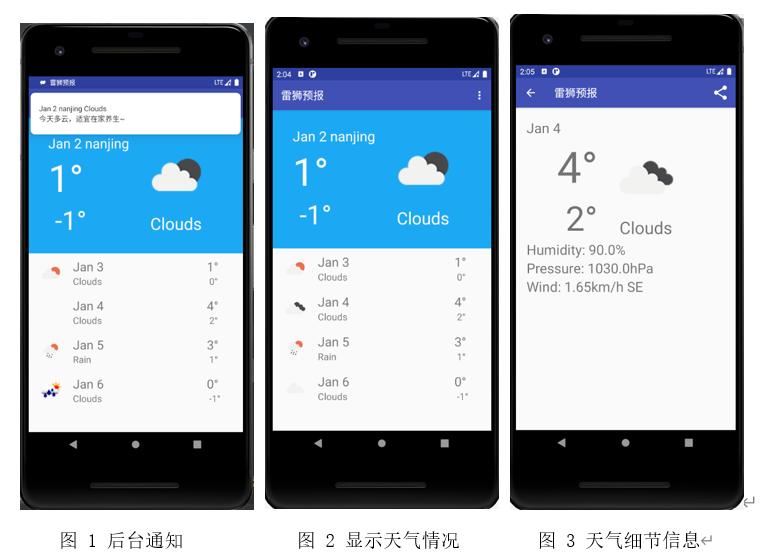
5.1.5 后台服务的使用
首先访问网络,获取新的天气数据存入数据库。再打开数据库,通知用户。最后通过延时服务来调用这个后台服务,保证销毁这个APP后,依然可以实现后台通知。
1
2
3
4
5
6
7
8
9
10
11
12
13
14
15
16
17
18
19
20
21
22
23
| String NoticeDate = notice.getDate();
String NoticeWeather = notice.getWeatMain();
String message = "";
if(notice.getWeatMain().equals("Clear")){
message = "天气晴朗,出行游玩注意安全哦~";
}else if(notice.getWeatMain().equals("Rain")){
message = "今天有雨,记得出门带伞哦~";
}else if(notice.getWeatMain().equals("Clouds")){
message = "今天多云,适宜在家养生~";
}
NotificationManager notificationManager = (NotificationManager) getSystemService(Context.NOTIFICATION_SERVICE);
Intent intent1 = new Intent(PollService.this,MainActivity.class);
PendingIntent pendingIntent = PendingIntent.getActivity(this, 0 ,intent1,PendingIntent.FLAG_CANCEL_CURRENT);
Notification notification = new NotificationCompat.Builder(PollService.this,"default")
.setContentTitle(NoticeDate+" "+NoticeWeather)
.setContentText(message)
.setSmallIcon(R.drawable.sfasf)
.setContentIntent(pendingIntent)
.setAutoCancel(true)
.build();
notificationManager.notify(1,notification);
|
5.1.6 列表与详细界面的拼接
使用fragment容器完成一个屏幕内显示两个activity布局
1
2
3
4
5
6
7
8
9
10
11
12
13
14
15
16
17
18
| <?xml version="1.0" encoding="utf-8"?>
<LinearLayout xmlns:android="http://schemas.android.com/apk/res/android"
android:orientation="vertical" android:layout_width="match_parent"
android:layout_height="match_parent">
<fragment
android:id="@+id/fragment_phone_detail"
android:name="com.example.weather.PhoneDetailActivity"
android:layout_width="match_parent"
android:layout_height="wrap_content">
</fragment>
<fragment
android:id="@+id/fragment_phone_list"
android:name="com.example.weather.PhoneListActivity"
android:layout_width="match_parent"
android:layout_height="wrap_content">
</fragment>
</LinearLayout>
|
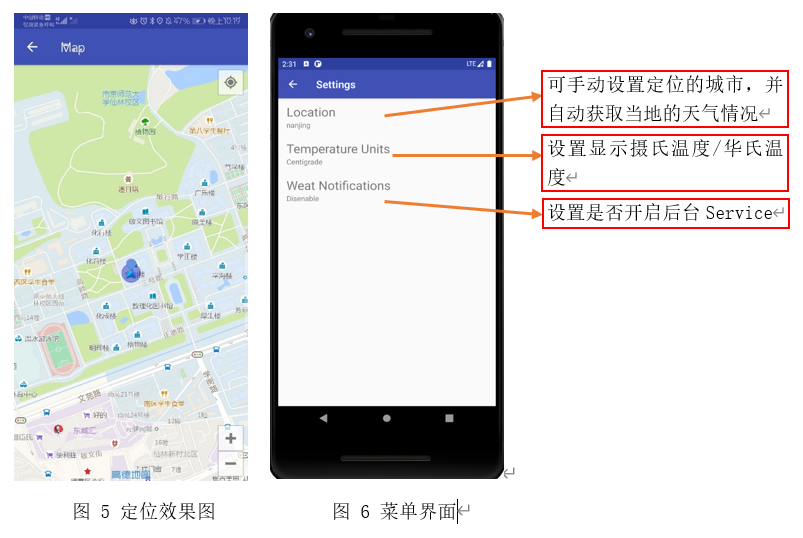
5.1.7 效果图展示
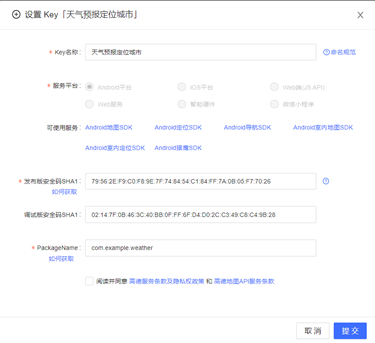
5.1.8 高德地图定位
对于地图的定位,我使用高德地图的API来定位,导入jar包,建立地图管理类,使用地图容器,重写各个生命周期。定位成功后,将定位到的城市名存入数据库,否则提示定位失败。
- 获取API Key -> cbcdc26a87de7ce1eee52e255b5bf341
5.2 2048游戏模块
5.2.1 触控交互设计
1
2
3
4
5
6
7
8
9
10
11
12
13
14
15
16
17
18
19
20
21
22
23
24
25
26
27
28
29
30
31
32
33
34
35
36
37
38
| setOnTouchListener(new OnTouchListener() {
private float startX, startY, offsetX, offsetY;
@Override
public boolean onTouch(View v, MotionEvent event) {
switch (event.getAction()) {
case MotionEvent.ACTION_DOWN:
startX = event.getX();
startY = event.getY();
break;
case MotionEvent.ACTION_UP:
offsetX = event.getX() - startX;
offsetY = event.getY() - startY;
if (Math.abs(offsetX) > Math.abs(offsetY)) {
if (offsetX < -5) {
swipeLeft();
} else if (offsetX > 5) {
swipeRight();
}
} else {
if (offsetY < -5) {
swipeUp();
} else if (offsetY > 5) {
swipeDown();
}
}
break;
}
return true;
}
});
|
5.2.2 主要逻辑设计(以左滑为例)
1
2
3
4
5
6
7
8
9
10
11
12
13
14
15
16
17
18
19
20
21
22
23
24
25
26
27
28
29
30
31
32
33
34
|
private void swipeLeft() {
boolean merge = false;
for (int y = 0; y < 4; y++) {
for (int x = 0; x < 4; x++) {
for (int x1 = x + 1; x1 < 4; x1++) {
if (cardsMap[x1][y].getNum() > 0) {
if (cardsMap[x][y].getNum() <= 0) {
cardsMap[x][y].setNum(cardsMap[x1][y].getNum());
cardsMap[x1][y].setNum(0);
x--;
merge = true;
} else if (cardsMap[x][y].equals(cardsMap[x1][y])) {
cardsMap[x][y].setNum(cardsMap[x][y].getNum() * 2);
cardsMap[x1][y].setNum(0);
MainActivity.getMainActivity().addScore(
cardsMap[x][y].getNum());
merge = true;
}
break;
}
}
}
}
if (merge) {
addRandomNum();
checkComplete();
}
}
|
5.2.3 界面UI设计
6.1 天气预报模块设计与调试中遇到的问题及解决方案
问题1:地图不能显示,每当调用时,APP就会崩溃。
解决方案:因为地图是我最后添加的功能,在Android的Logcat中显示太多,信息太多,我就新建一个工程,单独实验地图显示,后来错误指向的布局文件。我是用的高德地图的API,也都是按照开发手册上的说明来操作的,意思也没发现错误。经过查阅别人是如何使用高德地图的,发现了问题:高德地图的jar包有不同的类型,常规使用布局关键字是*.api.maps.MapView,但我下载的是2D地图,必须使用*.api.maps2d.MapView才能正常加载地图容器。
问题2:在每次获取到新的数据,或者要刷新已经出现的UI时,不能显示最新的数据。
解决方案:每次更新数据,与网络延时有很大关系,时间过长APP会依然显示上一次的天气数据,而且获取实时数据后也不可以实时刷新,必须通过重新启动这个activity才能实现UI刷新,通过网上查阅资料可以使用下拉刷新的控件,来刷新UI界面。
问题3:每次访问网络时,都会获取很多数据,如何处理这些数据,使得每次都能访问最新天气信息。
解决方案:如果每次都要将获得的数据存入数据库,会使得软件的缓存越来越大,所以如果成功从天气网站上获取到天气信息,在写入数据库前,先清空数据库,这样就可以保证每次UI刷新时,取得的数据都是最新的。
6.2 2048游戏模块设计过程中遇到的问题及感受
问题1:无法显示gameView、Card,但是移动时得分在增加。
出错原因:我的onSizeChange这个方法用于动态调整卡片的大小,是在构造函数执行之后才会执行的,而这个时候布局已经完成了,所以没有办法将卡片加入到布局当中去。
解决办法如下:
(1)不能在initGame()中调用startGame(),应该在onSizeChanged()时调用,当应用程序界面发送改变时,会自动调用该函数,也就是在构造函数之后去调用该函数。
(2)在onSizeChanged()中原本的addCards()的函数要去掉,因为已经在构造函数中分配了Cards
问题2:关于游戏逻辑方面的设计。
感想:很多看上去很容易实现的东西实际上并不好做,在逻辑处理时经常会出现意想不到的bug,这个时候可以通过debug的方式找出问题发生原因,此外观察logcat的输出也是比较快捷的方式。
完整代码可加QQ:1277565476